This post will be updated constantly and is essentially a live draft.
I've had a hard time finding pentest labs/how-tos/etc that are complete (without paying $1000+ on training). Most things include tid bits that they expect you to put together, well my brain needs structure so I'm going to do it myself. I've noticed a lot of people complaining that CEH isn't practical and that you should be doing OSCP, or eCCPT, or GPEN or whatever else is out there. I think this is a misconception - CEH is practical, they just don't test you on it.
This isn't going to cover everything, because I'm using Metasploitable 2 for a victim, meaning no Windows-based hacks, but it should be good enough to get your (and my) head around the methodology and tools used in your average grey box pen test. I'm also not going to go into depth about setting up Kali, Metasploit, or any other tools that I'll be using (Nessus, etc).
First up, reconnaissance.
Since this is a grey box pen test, meaning I know a little bit about the victim but not everything; we're in a closet somewhere plugged into an access switch; lets start off with a look around the LAN.
Fire up the Metasploit and create a new workspace - this will allow us to organize all our findings in a database for later reference. We'll need this information for our report at the end.

Before we get to scanning, let say we don't have a DHCP server, or we do and it's locked down with MAC reservations, we can plug into the network all we want but without an IP address we're not gonna get very far. Luckily layer 2 doesn't operate with an IP address.
The first thing we can try to do is just fire up Wireshark and see if anything comes in. If we're on an access port with other hosts, we should see some broadcast traffic at the very least.
 |
| My Juniper is very noisy. |
You can see above that my Juniper is harassing my LAN with ARPs. This tells us that there's a Juniper firewall on the network acting as the gateway, and we can also see the local subnet (10.10.1.0/24) for the VLAN we're connected to. From here we can try a couple Layer-2 attacks to gather more information; these aren't necessarily things you want to be doing when you're trying to be stealthy but in a professional pen-test they'll need to be done to ensure there's no gaps in your network. I'm going to put the Layer 2 attacks at the top of the second post in this series to keep all attacks organized, in a real hack you'll be bouncing back and forth between every phase outlined in the CEH, but for the purpose of this series it's going to attempt to keep them separate.
Now lets do a ping sweep of the LAN (based on the IP our Kali box has via DHCP) for potential targets. If you've ever looked at the manual for nmap, you know there's a couple dozen options and based solely on CEH content, it's hard to know when to use what.
TCP uses a three-way-handshake, SYN, SYN-ACK, ACK. Nmap uses this in the following way (by default): I send a SYN packet to my target, if I receive a RST, the port is closed, if I receive a SYN-ACK the port is open. Simple. Ok back to what we were talking about...
The lab network I'm using doesn't have an IPS, and the target doesn't have HIDS or a firewall configured (but I do have a stateful firewall in between) - but if I'm a hacker, I'm not supposed to know that. So let's try some evasion techniques.
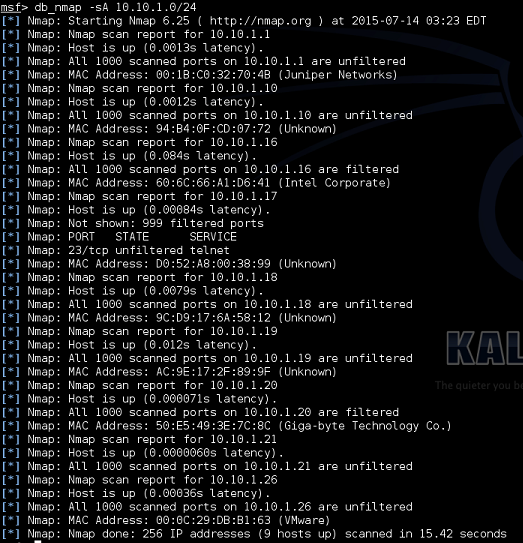
The first thing you wanna do is use ACK - this way IF there is a firewall on the host, you'll be able to know pretty easily, and you'll also decrease your chance of detection as the firewall (probably) won't log ingress ACKs (I say probably because it depends on your firewall). Using the db_nmap command directly from Metasploit allows us to log all of our findings to the workspace database we created earlier.
 |
| The unfiltered result tells us there is no firewall present on the machine. |
Following this we can do a TCP SYN scan on the target knowing that we're not going to trigger the firewall. To avoid any inline IPS or SIEM we can do our scan slowly using the -T option, -T0 for insanely slow and -T5 for very fast (-T3 is the default); hopefully this way no scanning patterns will be picked up.
Small breakdown of Nmap options:
TCP SYN Scan
nmap -sS <target>
The SYN scan is the default and most popular scan option. It's fast and relatively unobtrusive and stealthy. This is also known as a half-open TCP scan, as it does not complete the TCP handshake.
TCP Connect Scan
nmap -sT <target>
Similar to above, however it does open a connection (full three-way handshake) to the target machine, thus it's not as stealthy.
Version detection
nmap -sV <target>
Uses a TCP SYN scan to find open ports and fingerprints them, attempting to identify services running. Additional does a banner grab, which is displayed in the info column of our services output in Metasploit.
Ping Scan
nmap -sP <target>
Probably the simplest Nmap function, simply checks if hosts respond to ICMP packets.
Operating System detection
nmap -O <target>
Attempts to identify the operating system. This also ID's any open ports.
You can use the --osscan_limit in conjunction with this to only do a service scan and ignore the OS detection.
Another useful option is -PN, which runs scans regardless if the host is alive. It does this by omitting ICMP-based health checks against the target machine. This is useful for evading firewalls and IPS devices in the network as they can easily pick up ping sweeps.
I should use this time to point out one of the best resources on nmap and network scanning is Secrets of Network Cartography by James Messer - definitely worth a read.
Another thing you can attempt, which is going to be good if you've got a server you know is in the network, such as a DNS server, is a Zombie Scan (AKA Idle Scan). You'll be able to mascaraed your scan's source address as another on the LAN. The first thing you want to do is identify an idle machine on the network. It's important it's idle so we can use it to essentially relay our scan. It's going to do this by first telling us it's IP ID - this is a counter in the header of every IP packet the system sends out. It's going to work something like this:
We send out our SYN to our target using the zombie's IP as the source address, if the IP ID of our zombie increase by two (SYN-ACK, ACK) then we know the port is open, if it increased by one (RST) then we know the port is closed. But before that we need to ID a zombie, Metasploit has an auxiliary module for us to use for this purpose.
 |
| Hosts returning "Incremental" are gonna be our Zombies. |
So there's only two zombies in my home network that we can play with.
 |
| -Pn treats all hosts as alive, --source-port is source port spoofing, --data-length changes the packet size to avoid detection based on 58-byte default length of nmap scans, and -sI is our idle scan, the first IP being the zombie, the second our target. |
 |
| The response from my firewall. |
Unfortunately it looks like none of them work (probably because my firewall is preventing it), this is something that's gonna happen during most tests. Lets continue with using the CEH-default scan.
 |
| The db_nmap command ensures all data is saved to our workspace database. |
Using the hosts command we can see the list of hosts in our network that the Nmap scan found.

And the services command to see the ports open on each machine.
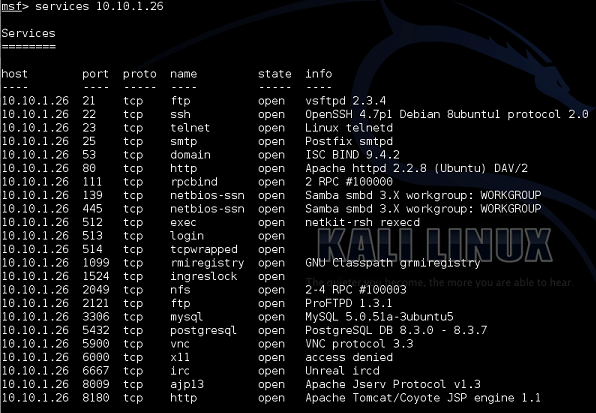
And with that we have our initial scan complete and successfully identified our target (sort of obvious with every service possible running on it, it's not called Metasploitable for no reason!).
No comments:
Post a Comment